Tuesday, March 16th, 2021 11:21 pm
MakeMKV - Introduction and Basic Guide
So I've been meaning to write up a more or less comprehensive beginner's guide to ripping movies with MakeMKV for a while but always got distracted by shiny things like servers and home automation and (potentially) water cooling.
This will be fairly specific to the requirements of MakeMKV, but some of this is fairly universal. So we'll start with hardware.
Hardware
1.) A computer, server, something that can run a ripping program.
Honestly, anything from the last ten to fifteen years should work. If it can run MakeMKV and a bluray drive, you're good. It is preferred if possible to have USB 3.0 minimum available; it gives you more options.
2.) Hard drive
This is my recommendation after roughly a decade and change of ripping movies. For safest, fastest, and best results, either have a dedicated drive to rip to or do it to a partition separate from the one your OS is on. This also applies to when you're encoding your media; your rip should be on a different drive than the one you encode to.
Example from my Ubuntu server:
Drive 1: Samsung 970 EVO SSD 1TB M.2 NVME (1 TiB)
Partitions:
Boot: /boot (243 MiB)
Root: / (95.37 GiB)
Home: /home/myname (100 GiB)
Handbrake (encoding): /media/solaris/handbrake (735.91 GiB)
Drive 2: Toshiba M.2 NVME
Partitions:
MakeMKV (ripping): /media/lunaris/rips (250 GiB)
Internal vs External
This is really up to your needs; internal may be faster during ripping but may be inconvenient if you're going to move everything to an external anyway. The combined speed of rip to internal + speed of move to external may mean your end to end is longer than just ripping straight to external. This is very much going to be 'whatever works for you' thing.
Size
If you're ripping to an internal drive:
Minimum: 100 GB available
Recommended/Preferred: 250 GB up
If you're ripping to an external drive:
Minimum: 500 GB
Recommended/Preferred: 1 T up
No, I have yet to rip a movie that was 500 GB--though 4K have gotten up to close to 100GB--but multiple versions, extras, or if you're ripping a television series. It is super annoying to have to pause ripping to move shit to another drive because you're out of space.
In general, I use the 15% rule; for any single working drive or partition, there needs to at all times be 15% free and clear and on any drive that houses my OS, I keep it at 20%. This doesn't necessarily apply to drives you use for just long term storage--example, your media drives--but I still keep at least 10% clear. Read/write speed drops dramatically the closer you get to full.
Type
So do you go with 5400/7200/1000 spin ups, SSDs, M.2, etc?
It matters, yes, but purely on the level of 'how long it takes to rip a movie and how much you care'. If it's a working drive, that's really all that matters.
But MakeMKV is very, very fast. To give you an illustration, until I upgraded to an M.2 NVME with a read speed of 2.6 GiB and write of 366.2 MB, MakeMKV helpfully informed me my disc was slower than it was and I should upgrade. If you're just popping a disc in to rip overnight most of the time, this really isn't important. If you're like me and hover over it jealously so you can begin encoding or you're planning a fun Friday night of coffee and ripping/encoding, now it matters.
In that case:
Minimum: exists and works
Recommended: SSD (pick a fast one)
Preferred: M.2
As far as price go, they're equivalent. If your computer doesn't have internal M.2 functionality but does has a minimum of USB 3.0, you can buy an M.2 enclosure for under $20, a 500 GB Samsung Evo M.2 for under $100 (on sale, under $75), and make your Fridays fucking incredible. Pick up some espresso; you deserve it.
3.) A bluray drive.
Internal/External
Unless you use a desktop, you may not even have the ability to use an internal, and even with desktops, you may not want to. This is up to you. Truthfully, I've done both and external may--and I stress may--take a slight speed hit with external, but since I switched to external USB 3.0, I haven't seen one.
If external, however, you're going to want to have USB 3.0 at minimum to run it or it will be slow as hell.
Brand/Type
Now we get a little more complicated.
What kind of discs do you want to rip?
a.) DVDs - most drives will accommodate this.
b.) Blu-rays (non-4K) - most drives will accommodate this.
c.) 4K - read this entry
Now, when I say above 'most drives', don't just go buy a random one from Amazon. Google what the current best drives to use for ripping are first and pick one of the top ten. Just because it works doesn't mean it works well, or is the fastest, or pick a property. Always do this when buying a new drive; the general standbys and brands don't really change much, but technology moves fast and when you're buying new, I generally recommend the best available you can manage with your budget.
When you do get it, however:
1.) Make sure you read up if there's anything special you need to do to it. In general, with DVD/Bluray level, it's plug and play.
2.) DO NOT upgrade the firmware or set the region unless the ripping software you're using tells you that you can.
Don't overthink this, however; again, on the level of DVD/non-4K bluray rips, if you get a drive from a recommendation list, you generally don't have to do more than plug it in and go for it. Truthfully, I've never had to do more than plug it in and go.
The 4K--more complicated. I have a whole post for that, and will answer any questions you might have.
Software
Windows/Mac: MakeMKV download
Linux/Ubuntu/etc: Forum Post With Instructions
For Linux/Ubuntu, you'll need to compile, but quite literally everything you need is on this page. All you have to do is follow the instructions and copy/paste the commands. I have--I mean literally--done this while drunk and half asleep. I started writing a bash script to automate it, but I kind of like doing it manually, tbh.
MakeMKV: An Introduction
For most of this tutorial, assume the GUI is identical between Windows/Mac/Ubuntu. I checked the first and third personally and read up on the second; all options and general look and feel should be pretty much the same.
GUI - Startup
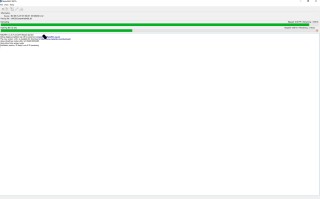
The first thing you'll see is the initial start screen that tells you useful information like 'where the log is going to be stored' and that it's opening your drives.
GUI - Main Page
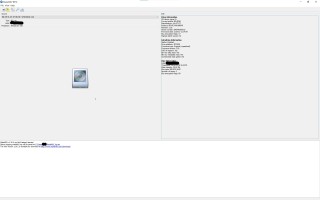
If your drive is mounted and there's a disc in it, it will look a lot like this. From top to bottom:
a.) Top - Menu
b.) Left Panel - Source Info and Action button
c.) Right Panel - Drive Information
d.) Bottom - log and debug info
Nothing particularly new and interesting in Menu, so we're skipping to View-->Preferences in the Menu. This is where the magic happens
Preferences
Preferences will appear at first without all the tabs. So let's fix that. On Preferences, General Tab, go to the Miscellaneous section in the middle and checkmark Expert mode. This should now show all the tabs you see in the screenshot. Go ahead and click Apply and Okay, then click View-->Preferences and get back here.
General Tab
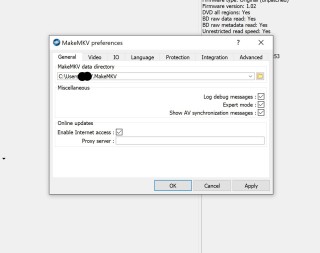
MakeMKV Data directory: there will be a default already in there, you can change it to wherever you want. This is where MakeMKV deposits ripping data (not the rip); just leave it for now.
Miscellaneous:
- Log Debug Messages - self-explanatory. Make sure this is checked
- Expert mode - You checked this
- Show AV Synchronization messages - Check this if you want the live debug to show when there - are AV sync errors. Recommended but not necessary.
Online updates -
- Enable internet access - make sure this is checked. This is how you rip shit.
- Proxy server - if you need to use this, you know how. If you are looking at it blankly right now, ignore it; you don't care.
Video Tab
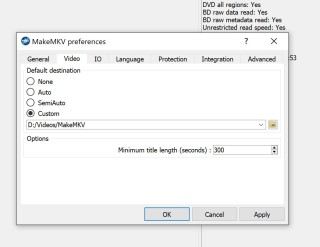
Default destination: this is defaulted, but you can set it to anywhere. This is where your rips will be stored, so you want to change this to your rip folder now. Click Apply and Save, then open up Preferences again and come to this page.
Options:
Minimum Title Length (seconds): I don't remember the default, but I set mine to five minutes (300 seconds). This is the shortest file that MakeMKV will then look for and discard anything shorter.
IO Tab
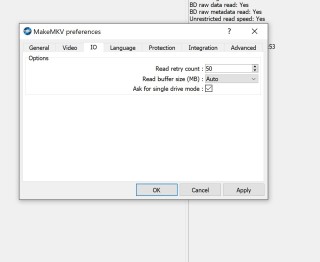
Options:
- Read retry count: there's a default value; I set mine to 50 retries. This is how often MakeMKV will keep trying to read something that doesn't want to be read.
- Read buffer size (MB): Leave at auto.
- Ask for single drive mode: this is if you have two bluray/optical drives that will be mounted at the same time. If you don't, leave it unchecked.
Language Tab
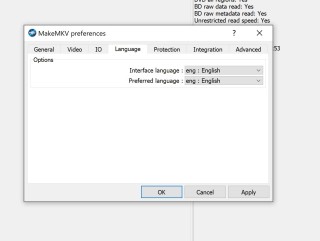
Options:
- Interface language: this is set to auto, I set manually to eng.
- Preferred language: this is set to auto, I set manually to eng.
Now, this is up to you. Setting to 'auto' means all streams--no matter the language--will be auto selected in every stream in the files you'll be ripping. If you set it to 'yourlanguage', it will only select streams in yourlanguage. Right now you're not sure what I'm talking about, but that's fine; I'll be illustrating it later in the post.
Protection Tab
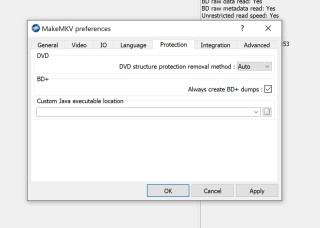
Unless you know what you're doing, leave everything here as is, but do make sure "Always create BD+ dumps" is checked. If you run into problems during a rip, you'll need this.
Integration Tab
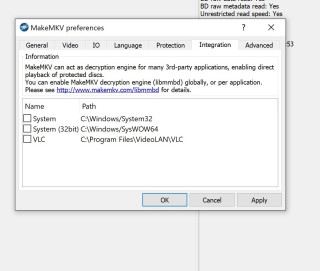
Unless you know what this is for, leave it as/is. I have literally never used this tab once.
Advanced Tab
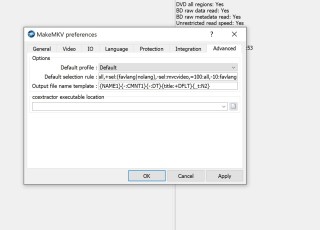
Options:
- Default profile: this is just the ripping profile. Leave at default. For ninety-nine percent of your ripping needs, you won't need to change that; if you do, you'll be doing it because you were googling about a thing you want to do and the site you're getting info from will tell you to. I have never changed this outside random experimentation.
- Default selection rule: this is useful; all the changes you made to preferences are coded in there now. This is your default for selecting which files on a disc you want to rip. You can find out more about this here.
- Output file name template: this post explains how to use the file name template
- ccextractor executable location: if you know what this is and need it, go for it. If you don't, ignore it.
GUI - Main Page (2)

Back on the main page, that drive icon on the left side panel? Click it; we're ready to pick some files. A popup will display talking about shareware functionality for thirty days. We'll come back to that later. Click okay.
GUI - File List
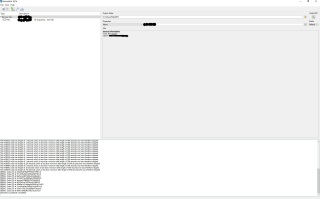
This is every file (equal to or greater than the minimum number of seconds you specified in Preferences->Video Tab->Minimum Title Length. As you can see, on this disc, there is only one.

Here's an example with more files. There can be a lot; it is recommended you set the minimum seconds so you can filter out sometimes dozens you don't want.
Now, going back to the first screenshot: we'll expand the file.
GUI - File List Expanded
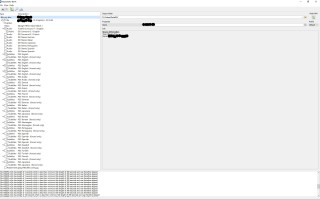
Yeah: this is why in Preferences->Language Tab, it's a good idea to pick a language if you neither want nor need Finnish subtitles or Portuguese audio streams. You can rip all audio streams of course, but depending on the audio stream size and type, that can make your file significantly bigger if they decide to offer TrueHD Surround 7.1 lossless in three languages or DDS surround 5.1 in five. Which sometimes, yes, they do. And if you're ripping ten files, having to go file to file in the list and uncheck all you don't want gets old fast.
On the right side of MakeMKV, you see your output folder pre-populated; that should match what was in preferences. To the right of that is the MakeMKV button; you click that when you're ready to rip. Below that is Properties with a dropdown--this just shows name of movie, filename it will be saved under, and sometimes metadata, it's different every time. To the far right, the profile you're using.
Make your selection on the files and click on MakeMKV button on the right side; your ripping adventure has begun.
MakeMKV: Preferences and Settings Advanced
Locations:
Windows Registry: HKEY_CURRENT_USER\SOFTWARE\MakeMKV
Mac: ~/Library/MakeMKV/settings.conf
Linux/Ubuntu: /home/username/.MakeMKV/settings.conf

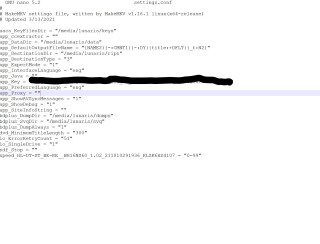
You can and should set everything in the GUI and should so you can create your initial settings. However, once you've done that, you can then edit them directly.
The names used are identical in all, so I'm listing all I know here. Some do not appear in the GUI ever, which I'll mark; all can be added manually. Some only appear in settings when you change the default in the GUI.
Can be Configured in GUI Preferences (grouped by tab):
General Tab
app_DataDir
app_ShowDebug
app_ExpertMode
app_ShowAVSyncMessages
app_Proxy
Video Tab
app_DestinationDir
app_DestinationType
dvd_MinimumTitleLength
IO Tab
io_ErrorRetryCount
io_RBuffSizeMB
io_SingleDrive
Language Tab
app_InterfaceLanguage
app_PreferredLanguage
Protection Tab
dvd_SPRemoveMethod
bdplus_DumpAlways
app_Java
Advanced Tab
app_DefaultProfileName
app_DefaultOutputFileName
app_ccextractor
Does Not Appear in GUI but Does Appear In All Settings Automatically:
speed_LONG_STRING_OF_NUMBERS_AND_FILES - this is the name of your drive with the word speed_ in front of it.
sdf_Stop
Does Not Appear in GUI and Does Not Appear in Linux/Ubuntu Settings But Does in Windows:
app_SiteInfoString
app_UpdateLastCheck
Does Not Appear in GUI Until You Buy License:
app_Key
Does Not Appear in GUI, Should Still Be Active:
bdplus_DumpDir
bdplus_SvqDir
aacs_KeyFilesDir
Does Not Appear in GUI, May be Deprecated:
app_dtshddec
Manual Editing
In Windows registry, edit with double click on the name and update the value.
In Linux, open settings.conf and enter settingname="settingvalue".
You see, some of these you actually need to set manually.
Drive Speed
speed_LONG_STRING_OF_NUMBERS_AND_FILES - if you have the right kind of drive, your drive is effectively limitless for read/write speed and you can set it here. This page explains what you need to do to make that happen.
App Key
app_Key - this is where you store the app key. You can get it in two ways: buy a license or use the beta key. The developers release a new key every one to two months. To stop the shareware popup, you'll want to do this.
In Windows Registry: \HKEY_CURRENT_USER\SOFTWARE\MakeMKV
Right click New, select String Value, enter app_Key. Value should be the key on the page link above.
In Linux: /home/username/.MakeMKV/settings.conf
Open settings.conf and enter app_key="betakeyfromthatpage"
Okay, I think I hit most of it. Anything that's unclear or anything I should add, tell me.
This is being edited for clarity
This will be fairly specific to the requirements of MakeMKV, but some of this is fairly universal. So we'll start with hardware.
Hardware
1.) A computer, server, something that can run a ripping program.
Honestly, anything from the last ten to fifteen years should work. If it can run MakeMKV and a bluray drive, you're good. It is preferred if possible to have USB 3.0 minimum available; it gives you more options.
2.) Hard drive
This is my recommendation after roughly a decade and change of ripping movies. For safest, fastest, and best results, either have a dedicated drive to rip to or do it to a partition separate from the one your OS is on. This also applies to when you're encoding your media; your rip should be on a different drive than the one you encode to.
Example from my Ubuntu server:
Drive 1: Samsung 970 EVO SSD 1TB M.2 NVME (1 TiB)
Partitions:
Boot: /boot (243 MiB)
Root: / (95.37 GiB)
Home: /home/myname (100 GiB)
Handbrake (encoding): /media/solaris/handbrake (735.91 GiB)
Drive 2: Toshiba M.2 NVME
Partitions:
MakeMKV (ripping): /media/lunaris/rips (250 GiB)
Internal vs External
This is really up to your needs; internal may be faster during ripping but may be inconvenient if you're going to move everything to an external anyway. The combined speed of rip to internal + speed of move to external may mean your end to end is longer than just ripping straight to external. This is very much going to be 'whatever works for you' thing.
Size
If you're ripping to an internal drive:
Minimum: 100 GB available
Recommended/Preferred: 250 GB up
If you're ripping to an external drive:
Minimum: 500 GB
Recommended/Preferred: 1 T up
No, I have yet to rip a movie that was 500 GB--though 4K have gotten up to close to 100GB--but multiple versions, extras, or if you're ripping a television series. It is super annoying to have to pause ripping to move shit to another drive because you're out of space.
In general, I use the 15% rule; for any single working drive or partition, there needs to at all times be 15% free and clear and on any drive that houses my OS, I keep it at 20%. This doesn't necessarily apply to drives you use for just long term storage--example, your media drives--but I still keep at least 10% clear. Read/write speed drops dramatically the closer you get to full.
Type
So do you go with 5400/7200/1000 spin ups, SSDs, M.2, etc?
It matters, yes, but purely on the level of 'how long it takes to rip a movie and how much you care'. If it's a working drive, that's really all that matters.
But MakeMKV is very, very fast. To give you an illustration, until I upgraded to an M.2 NVME with a read speed of 2.6 GiB and write of 366.2 MB, MakeMKV helpfully informed me my disc was slower than it was and I should upgrade. If you're just popping a disc in to rip overnight most of the time, this really isn't important. If you're like me and hover over it jealously so you can begin encoding or you're planning a fun Friday night of coffee and ripping/encoding, now it matters.
In that case:
Minimum: exists and works
Recommended: SSD (pick a fast one)
Preferred: M.2
As far as price go, they're equivalent. If your computer doesn't have internal M.2 functionality but does has a minimum of USB 3.0, you can buy an M.2 enclosure for under $20, a 500 GB Samsung Evo M.2 for under $100 (on sale, under $75), and make your Fridays fucking incredible. Pick up some espresso; you deserve it.
3.) A bluray drive.
Internal/External
Unless you use a desktop, you may not even have the ability to use an internal, and even with desktops, you may not want to. This is up to you. Truthfully, I've done both and external may--and I stress may--take a slight speed hit with external, but since I switched to external USB 3.0, I haven't seen one.
If external, however, you're going to want to have USB 3.0 at minimum to run it or it will be slow as hell.
Brand/Type
Now we get a little more complicated.
What kind of discs do you want to rip?
a.) DVDs - most drives will accommodate this.
b.) Blu-rays (non-4K) - most drives will accommodate this.
c.) 4K - read this entry
Now, when I say above 'most drives', don't just go buy a random one from Amazon. Google what the current best drives to use for ripping are first and pick one of the top ten. Just because it works doesn't mean it works well, or is the fastest, or pick a property. Always do this when buying a new drive; the general standbys and brands don't really change much, but technology moves fast and when you're buying new, I generally recommend the best available you can manage with your budget.
When you do get it, however:
1.) Make sure you read up if there's anything special you need to do to it. In general, with DVD/Bluray level, it's plug and play.
2.) DO NOT upgrade the firmware or set the region unless the ripping software you're using tells you that you can.
Don't overthink this, however; again, on the level of DVD/non-4K bluray rips, if you get a drive from a recommendation list, you generally don't have to do more than plug it in and go for it. Truthfully, I've never had to do more than plug it in and go.
The 4K--more complicated. I have a whole post for that, and will answer any questions you might have.
Software
Windows/Mac: MakeMKV download
Linux/Ubuntu/etc: Forum Post With Instructions
For Linux/Ubuntu, you'll need to compile, but quite literally everything you need is on this page. All you have to do is follow the instructions and copy/paste the commands. I have--I mean literally--done this while drunk and half asleep. I started writing a bash script to automate it, but I kind of like doing it manually, tbh.
MakeMKV: An Introduction
For most of this tutorial, assume the GUI is identical between Windows/Mac/Ubuntu. I checked the first and third personally and read up on the second; all options and general look and feel should be pretty much the same.
GUI - Startup

The first thing you'll see is the initial start screen that tells you useful information like 'where the log is going to be stored' and that it's opening your drives.
GUI - Main Page

If your drive is mounted and there's a disc in it, it will look a lot like this. From top to bottom:
a.) Top - Menu
b.) Left Panel - Source Info and Action button
c.) Right Panel - Drive Information
d.) Bottom - log and debug info
Nothing particularly new and interesting in Menu, so we're skipping to View-->Preferences in the Menu. This is where the magic happens
Preferences
Preferences will appear at first without all the tabs. So let's fix that. On Preferences, General Tab, go to the Miscellaneous section in the middle and checkmark Expert mode. This should now show all the tabs you see in the screenshot. Go ahead and click Apply and Okay, then click View-->Preferences and get back here.
General Tab

MakeMKV Data directory: there will be a default already in there, you can change it to wherever you want. This is where MakeMKV deposits ripping data (not the rip); just leave it for now.
Miscellaneous:
- Log Debug Messages - self-explanatory. Make sure this is checked
- Expert mode - You checked this
- Show AV Synchronization messages - Check this if you want the live debug to show when there - are AV sync errors. Recommended but not necessary.
Online updates -
- Enable internet access - make sure this is checked. This is how you rip shit.
- Proxy server - if you need to use this, you know how. If you are looking at it blankly right now, ignore it; you don't care.
Video Tab

Default destination: this is defaulted, but you can set it to anywhere. This is where your rips will be stored, so you want to change this to your rip folder now. Click Apply and Save, then open up Preferences again and come to this page.
Options:
Minimum Title Length (seconds): I don't remember the default, but I set mine to five minutes (300 seconds). This is the shortest file that MakeMKV will then look for and discard anything shorter.
IO Tab

Options:
- Read retry count: there's a default value; I set mine to 50 retries. This is how often MakeMKV will keep trying to read something that doesn't want to be read.
- Read buffer size (MB): Leave at auto.
- Ask for single drive mode: this is if you have two bluray/optical drives that will be mounted at the same time. If you don't, leave it unchecked.
Language Tab

Options:
- Interface language: this is set to auto, I set manually to eng.
- Preferred language: this is set to auto, I set manually to eng.
Now, this is up to you. Setting to 'auto' means all streams--no matter the language--will be auto selected in every stream in the files you'll be ripping. If you set it to 'yourlanguage', it will only select streams in yourlanguage. Right now you're not sure what I'm talking about, but that's fine; I'll be illustrating it later in the post.
Protection Tab

Unless you know what you're doing, leave everything here as is, but do make sure "Always create BD+ dumps" is checked. If you run into problems during a rip, you'll need this.
Integration Tab

Unless you know what this is for, leave it as/is. I have literally never used this tab once.
Advanced Tab

Options:
- Default profile: this is just the ripping profile. Leave at default. For ninety-nine percent of your ripping needs, you won't need to change that; if you do, you'll be doing it because you were googling about a thing you want to do and the site you're getting info from will tell you to. I have never changed this outside random experimentation.
- Default selection rule: this is useful; all the changes you made to preferences are coded in there now. This is your default for selecting which files on a disc you want to rip. You can find out more about this here.
- Output file name template: this post explains how to use the file name template
- ccextractor executable location: if you know what this is and need it, go for it. If you don't, ignore it.
GUI - Main Page (2)

Back on the main page, that drive icon on the left side panel? Click it; we're ready to pick some files. A popup will display talking about shareware functionality for thirty days. We'll come back to that later. Click okay.
GUI - File List

This is every file (equal to or greater than the minimum number of seconds you specified in Preferences->Video Tab->Minimum Title Length. As you can see, on this disc, there is only one.

Here's an example with more files. There can be a lot; it is recommended you set the minimum seconds so you can filter out sometimes dozens you don't want.
Now, going back to the first screenshot: we'll expand the file.
GUI - File List Expanded

Yeah: this is why in Preferences->Language Tab, it's a good idea to pick a language if you neither want nor need Finnish subtitles or Portuguese audio streams. You can rip all audio streams of course, but depending on the audio stream size and type, that can make your file significantly bigger if they decide to offer TrueHD Surround 7.1 lossless in three languages or DDS surround 5.1 in five. Which sometimes, yes, they do. And if you're ripping ten files, having to go file to file in the list and uncheck all you don't want gets old fast.
On the right side of MakeMKV, you see your output folder pre-populated; that should match what was in preferences. To the right of that is the MakeMKV button; you click that when you're ready to rip. Below that is Properties with a dropdown--this just shows name of movie, filename it will be saved under, and sometimes metadata, it's different every time. To the far right, the profile you're using.
Make your selection on the files and click on MakeMKV button on the right side; your ripping adventure has begun.
MakeMKV: Preferences and Settings Advanced
Locations:
Windows Registry: HKEY_CURRENT_USER\SOFTWARE\MakeMKV
Mac: ~/Library/MakeMKV/settings.conf
Linux/Ubuntu: /home/username/.MakeMKV/settings.conf


You can and should set everything in the GUI and should so you can create your initial settings. However, once you've done that, you can then edit them directly.
The names used are identical in all, so I'm listing all I know here. Some do not appear in the GUI ever, which I'll mark; all can be added manually. Some only appear in settings when you change the default in the GUI.
Can be Configured in GUI Preferences (grouped by tab):
General Tab
app_DataDir
app_ShowDebug
app_ExpertMode
app_ShowAVSyncMessages
app_Proxy
Video Tab
app_DestinationDir
app_DestinationType
dvd_MinimumTitleLength
IO Tab
io_ErrorRetryCount
io_RBuffSizeMB
io_SingleDrive
Language Tab
app_InterfaceLanguage
app_PreferredLanguage
Protection Tab
dvd_SPRemoveMethod
bdplus_DumpAlways
app_Java
Advanced Tab
app_DefaultProfileName
app_DefaultOutputFileName
app_ccextractor
Does Not Appear in GUI but Does Appear In All Settings Automatically:
speed_LONG_STRING_OF_NUMBERS_AND_FILES - this is the name of your drive with the word speed_ in front of it.
sdf_Stop
Does Not Appear in GUI and Does Not Appear in Linux/Ubuntu Settings But Does in Windows:
app_SiteInfoString
app_UpdateLastCheck
Does Not Appear in GUI Until You Buy License:
app_Key
Does Not Appear in GUI, Should Still Be Active:
bdplus_DumpDir
bdplus_SvqDir
aacs_KeyFilesDir
Does Not Appear in GUI, May be Deprecated:
app_dtshddec
Manual Editing
In Windows registry, edit with double click on the name and update the value.
In Linux, open settings.conf and enter settingname="settingvalue".
You see, some of these you actually need to set manually.
Drive Speed
speed_LONG_STRING_OF_NUMBERS_AND_FILES - if you have the right kind of drive, your drive is effectively limitless for read/write speed and you can set it here. This page explains what you need to do to make that happen.
App Key
app_Key - this is where you store the app key. You can get it in two ways: buy a license or use the beta key. The developers release a new key every one to two months. To stop the shareware popup, you'll want to do this.
In Windows Registry: \HKEY_CURRENT_USER\SOFTWARE\MakeMKV
Right click New, select String Value, enter app_Key. Value should be the key on the page link above.
In Linux: /home/username/.MakeMKV/settings.conf
Open settings.conf and enter app_key="betakeyfromthatpage"
Okay, I think I hit most of it. Anything that's unclear or anything I should add, tell me.
This is being edited for clarity
no subject
From:(- reply to this
- thread
- link
)
no subject
From:(- reply to this
- parent
- top thread
- link
)
no subject
From:if you're ripping TV series and want deleted scenes, you'll want to set the minimum value much lower-- i have mine at 15 seconds-- because otherwise they don't show up
(- reply to this
- link
)